The Windows 11 user interface is substantially different from older versions, and it also features new default icons. However, if you want to spice things up, you can change those boring default icons to custom ones.
The method to change your icons on Windows 11 will differ depending on the type of icon. If you want to change folder or shortcut icons, you can usually do so from their Properties window. For desktop icons, you will need to head to Desktop Icon Settings.
I predominantly change my folder icons to represent what they have inside. This makes my navigation much faster and looks cool as well. You can even stick with a theme in mind or add your own flair when changing icons.
Getting Icons Ready
To start, prepare the icons that you intend to change your default icons to. If you don’t have an icon in mind, you can search it online or on websites like DeviantArt or IconArchive. For others, Windows also has a pre-existing icon library to choose from.
In case you’ve downloaded your icon, make sure it is in .ico format. For those creative minds, you can even create custom icons and use them. You just have to convert those PNGs to .ico files.
Note: There are plenty of free online tools to convert PNG to .ico files.
If you’ve downloaded an icon pack, it will usually be in a zipped file. To unzip it, right-click the file, select Extract all, and click on Extract.
After getting your hands on your preferred icon, place them at a folder that is easy for you to locate.
As the methods to change icons for folder, desktop, and app differs, I have made individual sections for your ease.
Changing Folder Icons
You can pretty easily change individual folder icons by opening their Properties window and going to Customize. To do so,
- Right-click the folder whose icon you want to change.
- Select Properties.
- Go to the Customize tab.
- Click on the Change icon option.

- You can choose any of the pre-existing icons from the Windows icon library. If you want to instead set a custom icon, click on Browse.

- Navigate to the location of the corresponding replacement icon and double-click it.

- Click OK and Apply.
Changing App Shortcut Icons
If you want to change your app shortcut icons, it is pretty similar to changing folder icons. You’ll simply need to open their Properties window and go to Shortcut. Let’s see how,
- Right-click on the shortcut and select Properties.
- Go to the Shortcut tab and click on Change Icon.

- You can choose from the list of icons available. If there are no icons present or you want to set a custom one, click on Browse.

- Navigate to the location of the corresponding replacement icon and open it.
- Click on Ok and Apply.
Changing Desktop Icons
The desktop icons are shortcut icons of frequently used programs such as Network, Recycle Bin, and This PC. You can change these icons to whatever you want from the Desktop icon settings. Here’s how,
- Press Windows + I to open Settings.
- Navigate to Personalization > Themes.
- Scroll down and click on Desktop icon settings.

- In the new window that pops up, select the icon you want to change and click on Change icon.

- Select an icon from the pre-existing library or click on Browse to set a custom one.

- Click Ok and Apply.
Changing Drive Partition Icon
You can also change the drive partition icon that appears on File Explorer. However, you will either need to do so from the registry or use third-party applications. Anyway, I’ll show you how you can change your drive partition icon from the Registry Editor.
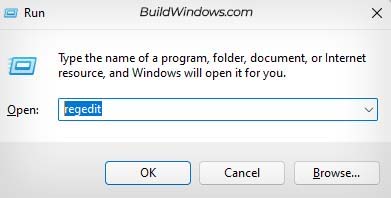
- Press Windows + R to open the Run utility.
- Type
regeditand open Registry Editor.
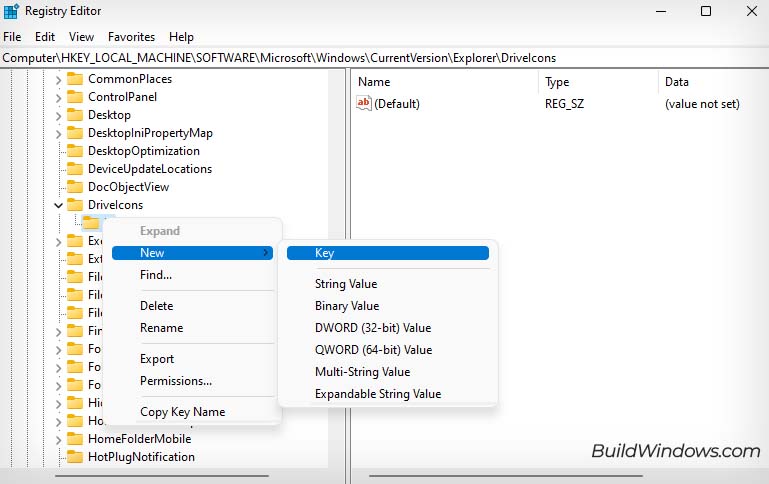
- Navigate to the location
Computer\HKEY_LOCAL_MACHINE\SOFTWARE\Microsoft\Windows\CurrentVersion\Explorer\DriveIcons - Right-click on DriveIcons and select New > Key.

- Name the new key as the drive letter you want to change the icon of. (I want to change the icon of
D:drive, so I’ll name it D.) - Right-click on the new key and select New > Key.

- Name the key as
DefaultIcon. - Open File Explorer, and navigate to the location of the replacement icon.
- Right-click the replacement icon and select Copy as path.

- Go back to the Registry Editor, select DefaultIcon, and double-click on the (Default) entry at the right panel.

- Press Ctrl + V to paste the file path under Value data and click OK.
- Close Registry Editor.
Lastly, if you want to change the icon size, it is pretty simple to do so. Right-click on an empty area to open the context menu, select View, and choose one of the icon sizes. The steps to change the icon size on the desktop and File Explorer are the same.

